Beginners guide to using git like a pro.
It is easy and fun, and saves a lot of time.
What is git?
Git is a free and open-source software for distributed version control. It differs from GitHub, one of the many websites that used git as its version control software. What is Distributed Version Control, you ask. distributed version control (also known as distributed revision control) is a form of version control in which the complete codebase, including its full history, is mirrored on every developer's computer.
For better understanding, let me explain you a situation I faced very early in my career and how git saved me from it.
When I first learned about git, I started using it everywhere. (You do not need internet to use git. You just need git installed in your system to track changes). I was writing my college essay for my final project which was due very soon. So after pulling an all-nighter, I went to take a quick nap. Sometime between that time, my roommate mischievously changed the whole essay to lorem ipsum and saved it.
But unknown to him, I had committed it to git before going to bed and had also created a backup branch. What a loser. I just had to go back to my last commit and pull it back from where I had left. You should have seen his face the next day when I nonchalantly submitted the project.
I will tell you exactly how I did it. It is easy and fun.
Initialize your Folder (also called Repository)
Go into the folder, the changes to which you want to track. i.e., You will be asking git to watch that folder (lets call it proGit) for any change that occurs hereafter. Open the command prompt (or any other CLI) inside proGit and type in this .
git init
git init - initialize a folder to track the changes made to it using git source control.
Make changes to the folder as you wish. You could add, delete, replace the whole code or even rename the files.
git add
The git add command adds new or changed files in your working directory to the Git staging area.
git add .
// this means git add all
git add <path>/< filename >
// this means that you add only the files you want to commit.
This is the most important step. Without it, the next step is utterly useless. As you're working, you change and save a file, or multiple files. Then, before you commit, you must git add. This step allows you to choose what you are going to commit. This way you make it harder for anyone(including yourself) to make a big blunder.
git commit
git commit creates a commit, which is like a snapshot of your repository. These commits are snapshots of your entire repository at specific times. This is the main reason why I was able to recover my progress from my last night project. git commit -m "this is the comment header message" -m "this is the comment body message" -m after the commit command means commit message.
Note : Always remember to add easily understandable comment messages. Over time, commits should tell a story of the history of your project.
So now that you’ve made the changes and saved the history to git. You can now rest easy that your progress isn’t going anywhere.
You wake up the next day and open your project. But now you do not like what you did last night. For some reason you need to uncommit and go back to your previous iteration. Time to revert the changes.
git revert
git revert is the safest way to change history with Git. Instead of deleting existing commits, git revert looks at the changes introduced in a specific commit, then applies the inverse of those changes in a new commit. It is as if you have two duplicate commits at different times. It would look something like this
a → b → c → b

git revert HEAD --no-edit
// adding the option --no-edit to skip the commit message editor
git revert HEAD~x
// x is a number. x=1 going back one more, x=2 going back two more, etc
git reset
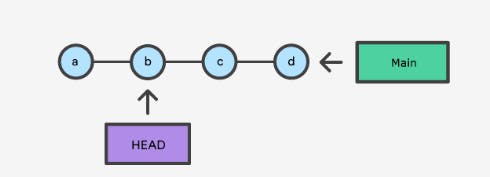
git reset brings the repository back to an earlier state in the commits without making a new commit. I would not recommend this unless there is some very good reason to totally prune the commits (like hiding sensitive data or api private keys, etc.) Resetting is a one way time travel where you can’t travel back to the future.
Before :
After :
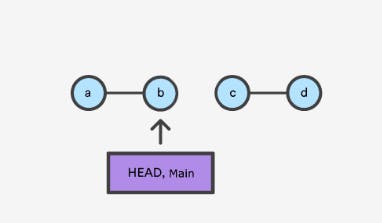
You can learn more about git reset in this blog by Atlassian.
So far so good. But now you want to try out some new changes to your project that you aren’t confident would work. So if that doesn’t work well, you will have to undo them later and move back to where you are now. You also don’t want to go through the hassle of reset or revert. Or say you want to create a different version of your project. This creates a perfect example where git branch can be used.
git branch
A branch is a new/separate version of the main repository.
git branch
// this shows the name of all the branches you have on your folder
git branch <new_branch>
//  this creates a new branch  with the name of the new-branch
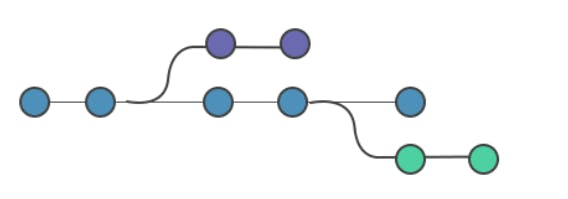
Branching from the parent branch(in blue). Green and purple circles signify the commits done in the new branches (also called the feature branches).
The above image visually shows you how your folder would be structured inside git. A folder can have as many branches as is required but I would suggest that you have as less as possible and they be as descriptive as possible in their names.
git branch -d <branch>
// This command deletes a redundant or useless branch.
Always delete the branches that you are sure will not be used or has been merged to the main branch (to avoid confusion). Never use uppercase -D unless you are double sure.
git branch -D <branch> force deletes the branch, even if there are unmerged changes.
git checkout : You can hop around from branch to branch using this command.
git checkout <new-branch>
// you are currently in the new-branch. all changes that you make hereafter will be effected in the new-branch.
git checkout main
// You have now hopped to the main branch.
Now that you are pretty sure that your feature branch looks better than your main project, you would certainly want to add this to your main branch.
git merge
Git mergewill combine multiple sequences of commits into one unified history. In the most frequent use cases, It is used to combine two branches.
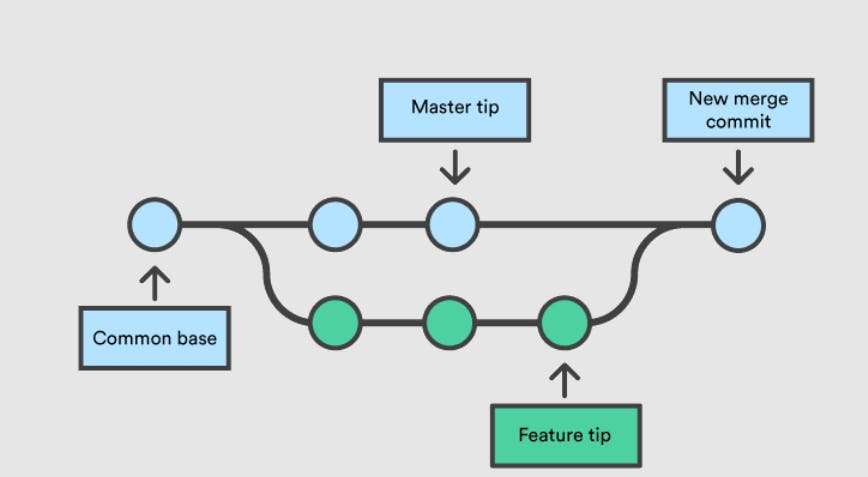
git checkout <old_branch>
// Place yourself on the branch which would act as the base branch. i.e., the new branch would merge into this branch.
git merge <new-branch>
// Merge the new branch to the base branch.
git branch -d <new-branch>
// Now delete the new-branch. This is already merged, hence redundant.
This is how you can start to use git in your personal projects and reap the benefits of this cool version control system. But there are a lot more features and sub features of all these commands. There are commands which are particularly useful when you are working in a team and storing project data in a remote repository like GitHub or Bitbucket.
I’ll be talking about some of them in my next blog. Let me know in the comments if there is something I missed or some confusion regarding the blog. Feel free to leave a heart if it helped you in any way.
this blog was originally posted by me on dev.to
